Installation
pyNastran is an easy package to install once you have the required Python modules. It’s a pure Python package so you shouldn’t have too many problems.
Install Procedure - From a Release
Overview
- Install Python
- Install numpy, scipy, pandas, vtk, PyQt4 (GUI)
- Install numpy, scipy, pandas (no GUI)
- Download pyNastran from Github
- Navigate to pyNastran directory on the command line
- Install the package
Download Python
- v0.8 is tested against:
- Python 2.7.12 (Windows/Linux)
- Python 3.3 (Linux)
- Python 3.4 (Linux)
- Python 3.5 (Windows/Linux)
- Options include:
- Anaconda Python (recommended)
- WinPython
- Base Python with the unofficial Windows binaries
Make sure to get 64-bit Python, so memory usage becomes a non-issue. It shouldn’t matter too much as long as your packages versions (e.g. numpy/scipy) are consistent. With either distribution, both Python and all 3rd party packages will be installed. With base Python, you need to do that yourself.
Note that Python 2.7.8+ is recommended because:
- pyNastran is mainly tested against 2.7
- not everything in the OP2 has been switched over to unicode from bytes
- the GUI saves your state
Additional packages
The following packages are required.
- scipy
- numpy 1.9+
- vtk 5.x, 6.x, 7.x (for the GUI)
- wxPython (for BDF/OP2/OP4 popups)
- PyQt4 (for the GUI; BDF/OP2/OP4 popups in v0.7)
- pandas (optional way to use the OP2 in iPython; v0.8)
PyNastran’s package requirements are tested with packages no older than 1 year
at the time of release. If you require an older version, try changing version
requirements in setup.py. It shouldn’t be that different, but pyNastran does
make use of numpy’s “new” axis option in numpy.linalg.norm and there was a
major bug fix in Python 2.7.7, so buyer beware.
Regarding the GUI, Python 2.7 with vtk==5.10.1 will give you the best
looking GUI. The GUI in Python 3 won’t save your settings.
Download pyNastran
If you want to most recent official release, either:
- Run
>>> pip install pyNastran
- Download the most recent release (required if you don’t want to install the GUI).
If you don’t want the gui, use setup_no_gui.py instead of setup.py.
Install pyNastran
Navigate to pyNastran directory on the command line. The
setup.pyfile should exist in the current directory.Either run...
- Able to edit the source code and have the changes propogate (recommended)
>>> python setup.py develop
- Changes will not propogate
>>> python setup.py install
If you don’t want the gui for Python 2.7, use setup_no_gui.py instead of setup.py.
Install Procedure - From Source
Overview
- Install Python
- Install numpy, scipy, pandas, vtk, PyQt4 (GUI)
- Install numpy, scipy, pandas (no GUI)
- Install Sphinx, GraphViz, alabaster (for documentation)
- Install Git
- Clone pyNastran-master from Github
- Install pyNastran
Install extra Python packages
Install Sphinx and alabaster
pip install Sphinx
pip install alabaster
Install Git
Download & install Git (required)
- Download a GUI for Git (optional)
- TortoiseGit (recommended for Windows)
Install pyNastran
There are two ways to install the dev version of pyNastran
- Download the most recent zip version
- Clone pyNastran (see below). Using Git allows you to easily update to the latest dev version when you want to as well as push any commits of your own.
If you don’t want the gui for Python 2.7, use setup_no_gui.py instead of setup.py.
Cloning pyNastran using TortoiseGit
Right-click in a folder and select Git Clone.
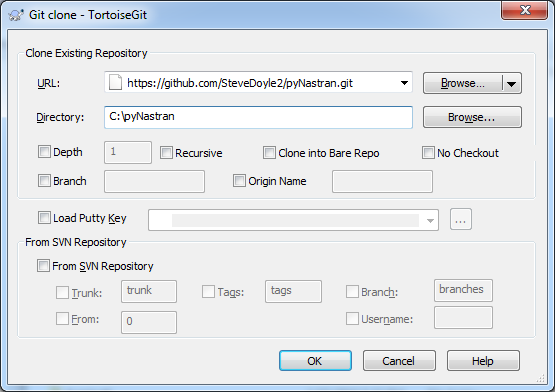
Enter the above information. If desired, click the branch box and and enter a branch name.
Then click OK to clone the dev version.
Cloning pyNastran Using Command Line
Checkout/clone the dev code by typing (preferred):
>>> git clone https://github.com/SteveDoyle2/pynastran
To checkout a branch
>>> git.exe clone --branch v0.8 --progress -v "https://github.com/SteveDoyle2/pyNastran.git" "C:\\work\\pyNastran_v0.8"